word processing

Missing iWork/Microsoft Office?

missing-iwork-pages1.jpg

I talk with a lot of schools who are planning an iPad/Macbook roll out. As they prepare computers for the students and staff, it is soon realised that the device, seems to come out of the box without a fully functioning word processor. In true, and traditional manner a search for the best word processor begins, but quite often schools make a wrong and costly decision.

missing-iwork-pages1

Most re-sellers will respond by suggesting you purchase a Microsoft Office license. “You’re gonna need Microsoft Office, the package which contains Outlook”. Seems obvious to me, but a school license for staff can easily run into the thousands of dollars. Surely in the era of change and transformation, we can do without spreadsheets and Word files?

It is equally disappointing that OS X arrives with no Pages, Keynote or Numbers. And at $21.00 each it is a costly exercise to get the iWork suite onto your Mac. So lets have a look at what is available... for free.

Text Edit is an awesome app You can write all day long, create bullets and lists, text alignment is easy and you can even change font. I ask you this; when the content is key, why do you need anything else? You can embed images as well. And yes, you can open Microsoft Word files. Albeit the tables may appear out of kilter, and the text wrapping and formatting may look different. But lets not get too precious over the layout and design just yet.

You’ll also have a great little program called Notes. Notes is not quite as flexible as Text Edit but when you need the convenience of easy iCloud sync, Notes does the job.

Word processing, not page layout Although not free, a personal favourite app of mine is iA Writer for the iPad. The reason being; a feature called Focusmode which blacks out the surrounding paragraphs and lines, allowing me to focus completely on the sentence at hand.

For easily distracted students (and bloggers) this feature has allowed me to press forward with word processing with the option to edit later. This kind of writing is commonly encouraged by English teachers, and with the advantage of iCloud sync, I can finish my writing on the Mac. Both iOS and iPad apps are very cheap.

Even more, with Google The real game changer (especially for education) is Google Drive. Perhaps the main purpose of this article is to encourage you to investigate this storage come collaborative space.

Producing words in an internet browser window is not exactly a revelation. After all, we have been typing and formatting emails for decades. Indeed Google Docs has been around for a few years too. But with a little repackaging Google Drive delivers a clutter free environment, with just enough options to convey our thoughts in a clear and concise manner.

The "Drive" component provides a generous 5gig of cloud storage to use as we choose. But viewing your documents on the web reveals a red "Create" button. Click here to word process with Gdocs (aka Google Docs).

There are no options for borders, or decorative strokes. You will not see any distracting templates either. The content is king, and for most teachers, it is the words which must combine for creative merit.

Need the option to collaborate with your students? Get feedback from your editor or brainstorm with your peers? Well emailing documents back and forth is so last century! and wikis are just becoming a little too disjointed. Take a look at the blue share button and watch in real time as multiple people type on the screen.

Contrary to popular belief, it is simple to setup offline access to your docs, but you will need to use the Chrome web browser.

Google Drive does way more than just docs

Are you a Math Teacher? Google Drive is being utilised by many third party app developers. If you need to graph for example I can’t recommend enough that you use Desmos.com. If you are a math teacher go and visit desmos.com now, it also feels great on the iPad.

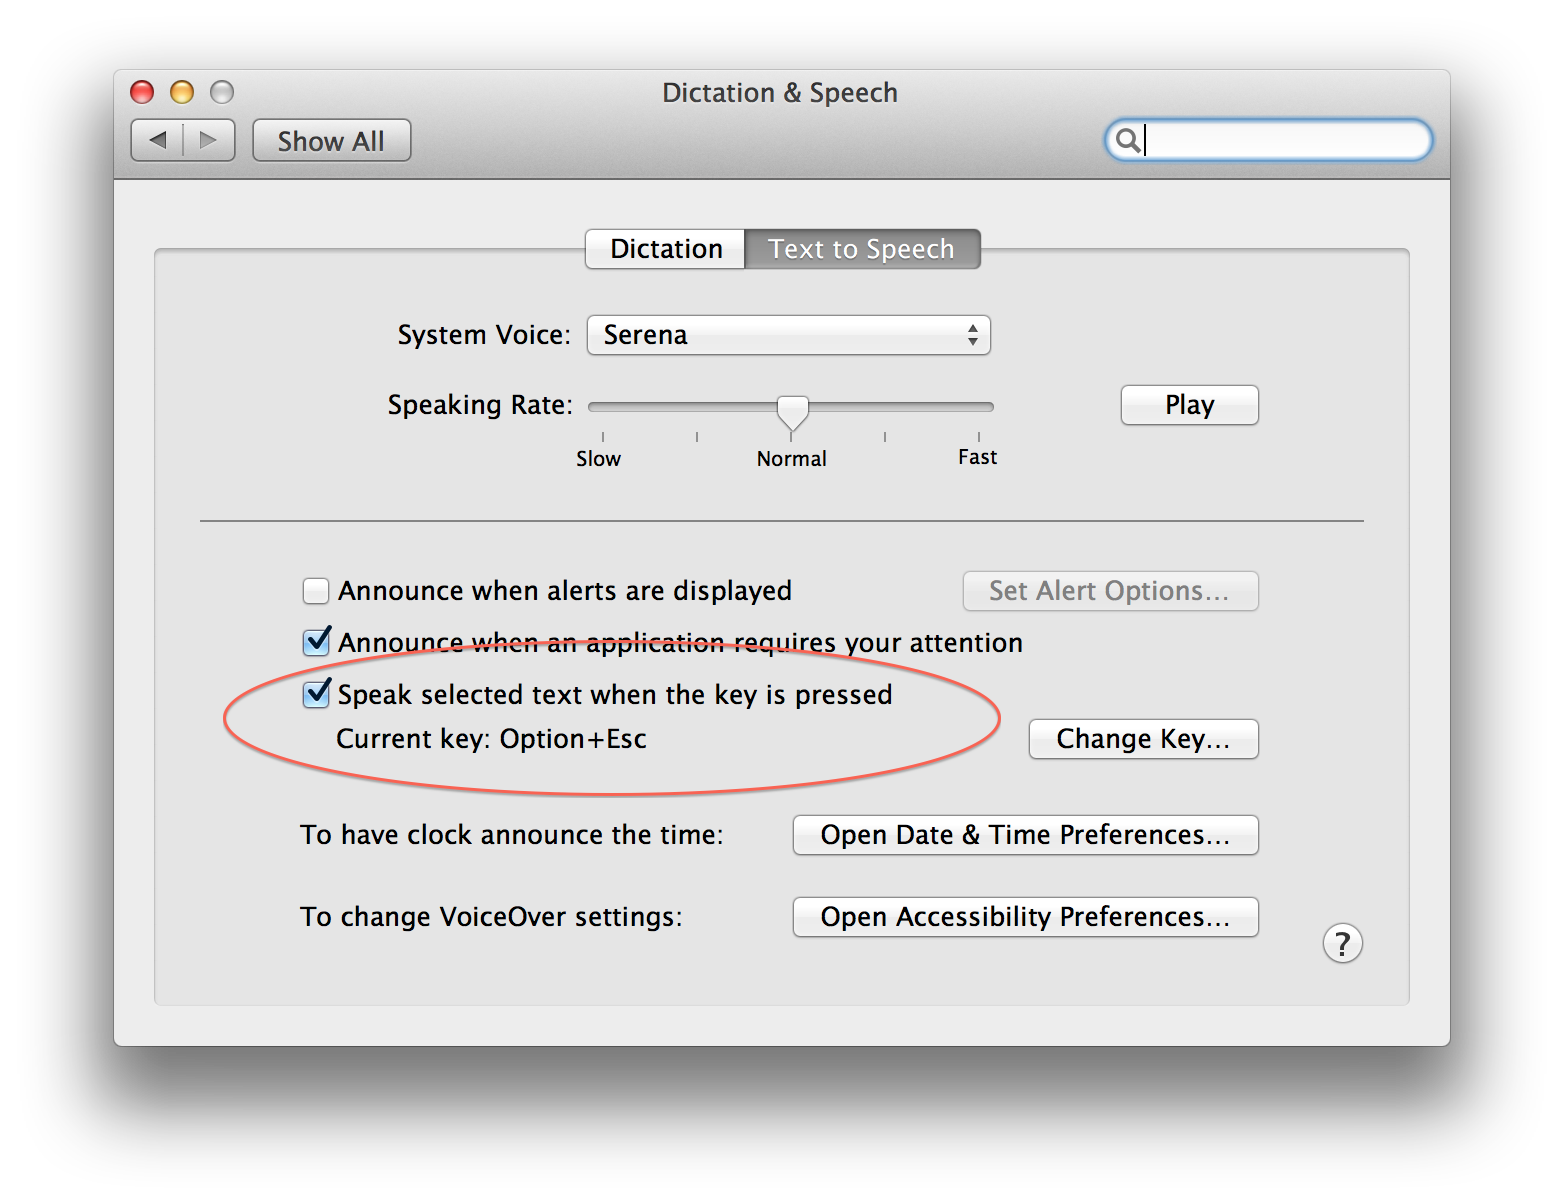
Accessibility thoughts On a Mac, in your System Preferences it is simple to enable text to speech. Be sure to tick “Speak selected text when key is pressed”. The default key combination is option and escape. Fortunately any highlighted text in Safari, Chrome, Pages, or Word is read aloud by the computer.

Text to speech example

But a negative for Chrome is that it utilises its own dictionary, so if you have changed your Mac Language to “British” English you’ll find organize is spelt correctly, overridden by Chrome! Chrome also disables the Mac’s amazing Thesaurus which is accessed with a 3 finger trackpad tap or control - command and D. So as much as I love Chrome, you may be better off sticking with Safari.


Conclusion It is clear to me that Office and iWork may be seeing the beginning of their end. The other day I picked up an old manual for Word. It must have weighed about 2 kilos! What a strange thought that people might have to study so hard just to learn how to ‘word process’.

We now live in an age where we are not compromising ourselves to accommodate uninspiring technologies, but technology is adapting to us, as humans. In particular for education, we must evaluate tools and look at what unnecessary components can be discarded. I firmly believe that Microsoft Office and iWork should stay right where their names suggest.

Word Processing basics

These notes are for young students are those who are new to word processing. Please feel free to copy these notes but please include a credit. The basics

Most students will have to teach themselves the basics of word processing, most develop some very bad habits which will permanently hinder them throughout their careers.  I would like to see more students adopting some very basic terminology and practices from an early age.  This short tutorial will look at page formatting, layout and design as well as printing and file handling.

Steps to produce a document

  • Specify the page size and orientation.  Go to File - Page Setup.  Default is A4 portrait.
  • Create
  • Save through out in a memorable place in your Home folder
  • Edit
  • Format
  • Print
  • Save (often!!)

As the content of the document is of overall importance I often encourage people to not focus on any formatting until the majority of text has been entered.  Aside from using the enter key to create new paragraphs, the student should focus on correct grammar and punctuation at this stage.


After a document is written and edited you may wish to experiment with fonts.  A document at this level should not consist of more than 2 fonts.  However the student may want to incorporate the use of italics and bold typeface to quote or highlight certain text.


A document will generally have 3 text elements which you may use different fonts and/or weight (bold):

  1. The Body text.  Your paragraphs will be full of Body text.
  2. The Heading text.  Used to highlight text or add new sub headings.
  3. The Title text.  Used for new sections and titles.

Lists should also be mentioned here, offering the use of bullets or numbered lists.  As used below for a list of some basic terminology (after an invisible page break has been inserted here).

Basic terminology

  • Cursor - symbol for where text will appear
  • Edit - make changes
  • Cut - remove selection from document and store temporarily on the Clipboard, which is a section of computer memory.  Generally you can only store one thing at a time
  • Copy - duplicate selection onto Clipboard
  • Paste - place contents of the Clipboard at cursor location
  • Undo - reverses whatever change you just made
  • Insert - add text at location without overwriting existing text
  • Delete - remove text (not saved anywhere)
  • Search - look for specific word(s) or character(s)
  • Replace - can replace specific word(s) or character(s) with stated text
  • Template - a document that serves as a pattern for a new document
  • Thesaurus - looks for synonyms for selected word
  • Spelling check - looks for spelling errors
  • Grammar check - looks for grammar/style errors (of limited help)


Printing

A decision should be early on if  you need your document printed on paper size any different to A4.  Your word processor will not automatically convert your document to a new page size if you change your mind later on.  Select File - Page setup to adjust paper size and orientation.

Saving

As soon as you start you first sentence please select File - Save.  The first time you do this you will be presented with the ‘save as’ dialogue box.  Please choose a relevant place inside your Home folder to keep the document.  Use cmd-S every time you take a pause to save the document as the Apple Mac does not do this for you!

Headers and footers

Headers and footers are repeated across each page in your document.  You can Insert date, page numbers, the file name or a personal message into your headers and footers.

Margins and columns

By default your margins are set to 2cms.  Please have a look in the Inspector Window.  The first category is the Document Inspector.

Please familiarise yourself with the properties on this page and see how the page has been laid out for you.  Agin this is all standard layout for word processors.

Spell check tips

When a word is misspelt it will be underlined in a red line.  If you right-click the word spelling suggestions will be revealed.

  • Another great tip is to hover your mouse pointer over a word, and press ctl-cmd-d.  Keep the ctl and cmd key held down.  Move the mouse over other words and you will have a constant window open showing you a dictionary definition and thesaurus entry.

The correct use of text boxes

Generally I would recommend against using text boxes.  Text boxes are quick solution to placing text and pictures onto the page exactly where you need them.  However it is better to master the use of using the return key and a combination of line spacing and paragraph spacing first.  Text boxes are objects on your page which can be customised with colour backgrounds and picture backgrounds, as well as line strokes and picture frames.

Inserting pictures and wraps

The best method to inserting pictures is to position the cursor where you would like the file (or picture) to be.  Then select Insert - Choose from the top menu.  Select the picture from your home folder (or where ever it may be) and the picture will be placed in position on the page.  The picture is placed ‘Inline‘ meaning it behave just like any other letter in your document.  You can adjust the size of the picture by pulling the small square handles at the pictures edge.  Once the picture is the correct size please experiment with the way the text wraps around the picture.